|
EASTEC INDUSTRIAL (HK) CO., LIMITED
|

gps vehicle recorder
| Payment Terms: | T/T,L/C,WU |
| Place of Origin: | Guangdong, China (Mainland) |
|
|
|
| Add to My Favorites | |
| HiSupplier Escrow |
Product Detail
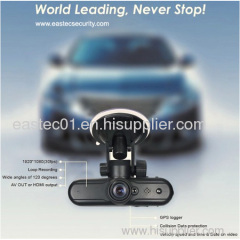
ET-GVR10-GPS
1080P+GPS+G SENSOR GPS Logger &Vehicle Recorder
- ET-GVR10-GPS
- 1080P+GPS+G SENSOR GPS Logger &Vehicle Recorder
- Features:120 degree wide lens1920*1080(30fps) HDMIMax. 64G Micro-SD CardGPS loggerLoop RecordingCollision Data protectionWide vision angle120 degreesAV OUT or HDMI outputVehicle speed and time & Date on videoCan work with external GPS navigatorThe Unit1.Remote Control Receiver2.Laser Light3.Lens4.Mic5.HDMI Port6.Format Button7.Reset Button8.DC Port (12 ~ 24V)9.USB Port (As power supply: 5V / 1A)10.Micro-SD Card Slot11.USB Switch12.Laser Light Button13.Blue LED Indicator14.Red LED Indicator15.Sound On/Off16.File Protection ButtonAccessories1.Remote controlA.Rec ButtonB.Mode ButtonC.Menu ButtonD.Playback ButtonE.Up ButtonF.Down ButtonG.Left ButtonH.Right ButtonI.OK Button2.Car Charger Cable3.USB Cable4.HDMI Cable5.Sucker HolderCaution:nUsing the adaptor amperage over 5V 1A will lead to irreparable damage the devicen(awaiting for information)n(awaiting for information)1.Video ModeThe unit is automatically start recording when the power supply (Red LED will flash) and automatic shut down with a custom menu delay when disconnecting the external power supply.Press the remote control with "Rec Button" to stop recording (Red LED will be on instead of flash), press "Rec Button" again to continues recording (Red LED flash again).Press "Laser Light Button" to point out the position of the lens.Press “File Protection Button”or turn the unit out of horizontal position during recording,the file will be protected and won't be replaced automatically.2.Camera ModePress the remote control with “Mode Button” to enter camera mode (Red LED will be on instead of flash). Press the remote control with “Rec Button” to take a picture.Press “Laser Light Button” to point out the position of the lens.3.Playback ModeConnect the unit and HD TV with the HDMI cable. Press the remote control with “Playback Button” from video mode to playback mode. Press the remote control with “Left / Right Button” to select the files. Press the remote control with “OK Button” to play the video file. Press “Playback Button” again to stop playing the file.4.Menu SettingConnect the unit and HD TV with HDMI cable. Press the remote control with “Menu Button” the menu setting diagram will be shown on the TV screen. Press the remote control with “Up / Down Button” to select the item and press “Left / Right Button” to change the value then press “OK Button” to confirm the setting. Refer to the following table for menu list:Video ModeImage ParamSystem SetupLanguageVideo resolutionVolumeEnglishSceneFlickerChinese (Simplified)Digital effectAuto power offChinese (Traditional)White BalanceTime zoneKoreanISOTV outJapaneseEVStampRussianContrastDate & TimeUkrainianSharpnessFormat storage cardRecycle recordResetVideo flipVersionCamera ModeImage ParamSystem SetupLanguagePhoto sizeVolumeEnglishSceneFlickerChinese (Simplified)Digital effectAuto power offChinese (Traditional)White BalanceTime zoneKoreanISOTV outJapaneseEVStampRussian
Didn't find what you're looking for?
Post Buying Lead or contact
HiSupplier Customer Service Center
for help!
Related Search
Avl Vehicle Gps Tracker
GPS Vehicle Tracker
Vehicle Tracking Gps
Gps Vehicle Tracking
Gps Vehicle Tracking System
Vehicle Gps Tracking Device
More>>
Find more related products in following catalogs on Hisupplier.com
Company Info
EASTEC INDUSTRIAL (HK) CO., LIMITED [China (Mainland)]
Business Type:Manufacturer, Trading Company, Distributor/Wholesaler
Country/Region: China (Mainland)